Salad with Roasted Beets and Citrus

INGREDIENTS

  • 4 medium beets (Chioggia is a beautiful variety)
  • 3 garlic cloves, unpeeled
  • 1 medium fennel bulb
  • 3 citrus fruit (I used a mix of orange, blood orange, and Meyer lemon)
  • 1 head escarole
  • 1 head green radicchio
  • 1/2 head red radicchio
  • 1/4 cup mint leaves
  • 1/4 cup tarragon leaves
  • 1/3 cup roasted hazelnuts, chopped
  • 1 tablespoon fresh lemon juice
  • 2 tablespoons apple cider vinegar
  • 1 teaspoon Dijon mustard
  • 6 tablespoons extra-virgin olive oil, plus some for drizzling on beets
  • 1/8 teaspoon coarse sea salt
  • Freshly ground black pepper

DIRECTIONS

Preheat the oven to 375 degrees. Trim the beets of their tops and scrub clean. Pat beets dry and place cut side down, along with the garlic cloves, on a large rectangle of aluminum foil. Drizzle with a little olive oil and sprinkle lightly with salt and pepper. Wrap foil tightly, place the packet on small baking sheet, and roast in oven until beets are tender, about 45 minutes to one hour. Carefully open foil and let cool briefly. When able to handle, use a paper towel to rub the skins off the beets, and cut each beet into eight pieces. Reserve the roasted garlic cloves for the vinaigrette.

For the fennel, trim the green stems and cut bulb in half through root. Trim away most of root. Thinly slice the fennel and reserve in cold water. Drain before using.

For the citrus fruits, cut a little bit off each end, exposing the flesh below. Place cut side down on cutting board and trim away the pith and zest (the white and colorful stuff, respectively) by following the contour of the fruit with your sharp knife. Next, cut crosswise into round slices (pop the seeds out if you can) or cut out segments by trimming alongside the inner membranes.

Cut the radicchio into one-inch-wide pieces and tear the escarole into smaller pieces. Pick the mint and tarragon leaves off the stems and wash along with the chicory.

For the vinaigrette, remove the roasted garlic from the cloves and whisk together with the lemon juice, apple cider vinegar, Dijon, and olive oil. Season with a three-finger pinch of salt and a few grinds of black pepper.

Combine all of the ingredients together in a large bowl. Start by using about 1/2 to 3/4 of the vinaigrette, adding more to taste. Your clean hands make great salad tongs.

This recipe is from the website of Kaiser Permanente, Food for Health, Recipes for Life.

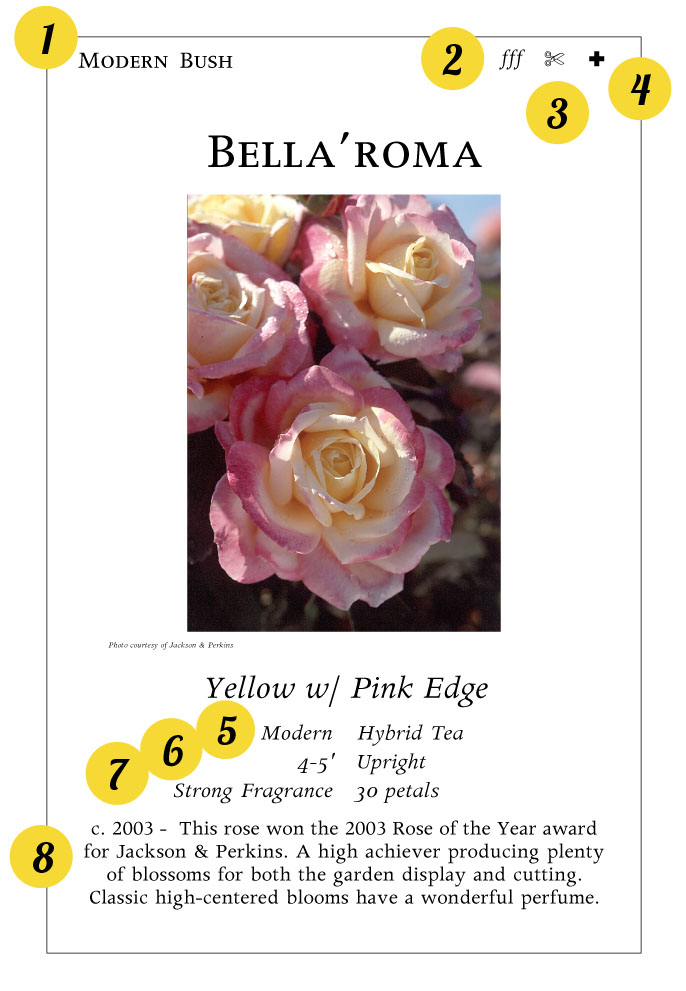
How To Read Our Rose Signs

We pride ourselves on providing both informative signage throughout the nursery and professional advice from our staff to help you find and choose the best plants for your garden. That said, with the abundance of plant varieties available at the nursery, sometimes the hardest part is narrowing down the choices!

Our rose signage features key details that we hope, make it a little easier to choose. Our signs are designed to help steer you in the right direction, whether you're planting for fragrance, color, cutting and beyond! Below, you'll find our easy guide to help you master our signage. As always, our staff is on hand to help with any questions that may arise! 

Sample Rose-edited.jpg

1. Group Categories

Modern Bush - Refers to those roses typically used for cut flower arranging and exhibition. Includes Hybrid Tea, Floribunda and Grandiflora.

Landscape - Plants in this group have been hybridized for easy care - they rarely need to be sprayed or deadheaded. 

Climbing - These are roses that send out long canes and can be trained on a wall or over an arbor.

English Style - Roses that combine the open-flowering habit and fragrance of Old Garden roses with the continuous bloom and color range of modern hybrids. 

Miniature - Roses with little flowers and petite foliage on plants that stay 24" high and under.

Patio Tree - Floribunda and Miniature hybrids grafted on 24" stems to form a small tree.

Standard Tree - Hybrid Tea, Grandiflora and Floribunda hybrids grafted on 36" stems to create a larger tree. 

2. Fragrance

Each "f" denotes the level of fragrance. One "f" is light while "fff" is strong.

3. Good For Cutting

If the signage features a scissor symbol, this means the rose is good for cutting. This is especially important if you are planning on using your roses to create bouquets and arrangements. 

4. Disease Resistance

A "+" sign denotes that the particular variety has shown more resistance to one or more of the major rose diseases including rust, powdery mildew, black spot, etc. 

5. Rose Types

Hybrid Tea - Typical cutting rose. Long stemmed, usually one large blossom per stem.

Floribunda - Usually shorter than Hybrid Tea. Multiple smaller blossoms. Can still be used for cutting. 

Grandiflora - Usually taller than Hybrid Tea. Large, well-formed flowers in clusters. Can be cut. 

Other Types - For more information on some of the many other rose types, please ask for assistance from our Nursery staff!

6. Height and Habit

Explains how the plant grows. 

7. Petal Count

Roses with a high petal count require more heat to open fully. On the cooler side of the tunnel (Oakland and Berkeley), choose roses with 35 or less petals, on the warm (hot) Lamorinda side, roses with 30 or more petals do well. 

8. Introduction Date

Or AARS Award, and a brief description.

Harvesting From Your Winter Garden

It's time to harvest your winter veggies! As the harvest season continues, we'll be covering all you need to know for a successful picking. Stay tuned for more! 

collards.jpg

COLLARDS

Harvest young plants or lower leaves on older plants. Leaves should be young and tender. Taste improves with cool weather. 

MUSTARD GREENS

Mustard greens can be eaten raw or cooked. The whole plant can be cut at once or individual outer leaves can be picked for a cut-and-come-again harvest. The young leaves, four to five inches long, are mild-flavored and can be eaten raw in salads. The older leaves taste better when prepared as cooked greens. Avoid yellow, over mature mustards with seeds or yellow flowers attached.

When choosing mustard greens, know that the smaller, more tender leaves of spring will generally be milder in flavor than the mature leaves of summer and fall. If you don't find the flavor of the raw leaves too harsh, try adding a small amount to a salad for a lively, peppery accent. To tame the bitterness, use a combination of heat, salt and fat. We like mustard greens just lightly wilted, blanched, or sautĂŠed to retain the bright color and texture, but they can also be boiled or braised longer to soften the flavor. Ingredients that help balance the bitterness include salt, soy sauce, bacon, prosciutto, toasted nuts, olive or sesame oil.

PEAS

English: The pea pods should look and feel full. Peas are sweeter if harvested before they are fully plumped. Peas really need to be tasted (raw) to determine if they are sweet enough.

Edible pod: Harvest when the pods are fully developed, but before seeds are more than half size.

kohlrabi.jpg

KOHLRABI

Harvest once the kohlrabi "bulb" is between two and three inches in diameter for best texture. Too much longer than that and it will be tough and woody. It keeps well 7 - 10 days if stored in a cool place.

There are two varieties of kohlrabi. One is purple and the other is pale green. They both have the same mild and fresh tasting flavor, not dissimilar to water chestnuts. Kohlrabi is neither as peppery as a turnip nor as distinctive as cabbage, but easy to see why people think it is a little of both. It can be served as  an alternative to carrots and turnips, nicely steamed and whipped.

Although kohlrabi is not a very popular vegetable in North America, it is commonly eaten in Europe, as well as in China, India, and other parts of Asia. The bulbs are often sliced and eaten in salads and the greens are cooked in mustard oil with garlic and chilies.

Very small kohlrabies are tender and can be cooked whole. However, if they are and bigger than 2 inches in diameter, they can be stuffed. To do this, hollow out a little before cooking and then stuff with onions and tomatoes, for instance. For sliced kohlrabi, cook until just tender and serve with butter or a creamy sauce. They can also be cooked long and slow in gratin dishes, parboil them and bake in the oven covered with cheese sauce.

Read on for a delicious Roasted Roots with Kale, Mustard Vinaigrette, and Farm Egg recipe! 

CARDOONS

High in potassium, iron, and vitamin A and C, cardoons are too bitter and tough to eat raw, but once cleaned and cooked, they are an unusual, tender delight. The stalks are dipped into the wonderful Piedmontese bagna cauda, a hot dip of olive oil and anchovies, and take well to frying, roasting, and making into soup.

Select bunches with firm, fresh turgid stalks, fresh looking leaves, and lots of available inner stalks. Keep in mind that the very tough outer stalks must be removed and discarded, so a good batch of inner stalks is important.

Place cardoons in a plastic bag or wrap in a damp kitchen towels and keep in the refrigerator for a day or two. They are best when fresh, and since the take up a lot of space in the refrigerator, it is wise to prepare them soon after harvest.

In preparing, strip away and discard the tough outer stalks. Using a stainless steel or carbon-stainless steel alloy knife, strip the inner stalks of any thorny spurs and fibrous stings, much like you clean celery. Cut the stalks as directed in individual recipes and, if not put into liquid to cook immediately, immerse in water to which lemon juice has been added to stave off browning. You will usually need to simmer the cardoon pieces in liquid for 40 - 60 minutes, or until they are tender, before using them to fry, in gratins or soups. They are also good sautĂŠed with olive or served with a cheese sauce. 

Roasted Roots with Kale, Mustard Vinaigrette, and Farm Egg

Serves 2 to 3

INGREDIENTS 

  • 1 bunch baby turnips
  • 1 pound mixed baby potatoes
  • 1 kohlrabi
  • 2 tablespoons olive oil
  • 2 tablespoons extra-virgin olive oil
  • 2 sprigs rosemary
  • 1 tablespoon salt
  • Cracked black pepper
  • 1/2  pound baby kale
  • 1 egg per person (optional)

Mustard Vinaigrette

  • 1 tablespoon whole-grain mustard
  • 2 tablespoons champagne vinegar
  • 1/4  teaspoon salt
  • 6 tablespoons olive oil

PREPARATION

1.    Preheat the oven to 375˚F.

2.    Scrub the rutabaga and turnips clean using a clean brush, then cut into bite-sized pieces. Peel the kohlrabi, removing all its tough outer skin. Cut the kohlrabi to match the size of the baby turnips and baby potatoes, so they will roast evenly.

3.    In a roasting pan, place the roots, 1/4 cup water, olive oil, rosemary, salt, and black pepper. Cover with aluminum foil and roast in the oven for 40 to 45 minutes. Check the vegetables with a small knife; it should go through without resistance.

4.    While the vegetables are in the oven, clean the kale. Make the vinaigrette by whisking together the mustard, vinegar, and salt, then slowly streaming in the oil while continuing to whisk the mustard mixture.

5.    When the roots are done, toss them, while still hot, in a bowl with the baby kale and vinaigrette.

6.    If you are adding the optional egg, warm a tablespoon of olive oil in a nonstick pan. Crack the eggs into the pan; season with salt and pepper. Once the whites are set, gently flip the eggs and cook until they reach the desired consistency. Alternatively, you can hard-boil the egg.

7.    Top each serving of vegetables with an egg and serve. This recipe will make extra. The leftovers are great as a cold salad the next day.

This recipe is from the website of CUESA (The Center for Urban Education about Sustainable Agriculture). www.cuesa.org This recipe was demonstrated for CUESA’s Market to Table program on March 9, 2013.

Source: Robin Song, Hog & Rocks


A New Leaf

If you haven’t already heard, we are making some exciting changes in our florist greenhouse! But first, let’s take a look back at our “roots”…

Did you know that when we first opened, we had no flower shop? The greenhouses up on the hill were used for growing & selling African Violets and some azaleas. Once the Lord and Burnham greenhouse (a state of the art model at the time) was added, the florist department really took shape and in 1962 our “true” florist became a reality. This was the heyday of carnations, chrysanthemums, marguerite daises and roses. More blooming plants were brought in along with houseplants and a big fridge full of cut flowers for our newly hired designers.

Here are a few great pictures of those early days…

Terracotta chickens are still available, as well as the "bubble bowls!"

Terracotta chickens are still available, as well as the "bubble bowls!"

3.jpg
1.jpg
On trend: faux fruit, ferns and chrysanthemums!

On trend: faux fruit, ferns and chrysanthemums!

A coffered ceiling! Our collection of silks or "everlasting" flowers can now be found in this alcove!

A coffered ceiling! Our collection of silks or "everlasting" flowers can now be found in this alcove!

This is our upper greenhouse, now used as storage for our Garden Shop.

This is our upper greenhouse, now used as storage for our Garden Shop.

When reminiscing about our past, it reminds us that our business and in turn, our industry is always evolving and sometimes “everything old is new again”. As we welcome in the New Year we’re going back to our roots in a way and will bring you a wide selection of beautiful plants presented in a brand new environment. We are excited about our new look and invite you to come discover it for yourself. Please excuse our "mess” as we work on creating an inspiring place to let your imagination run free.

In order to accommodate a much wider assortment of indoor plants of all kinds, we’re making room by eliminating all of our fresh cut flower offerings. This will give us the freedom to make room for more of what you’ve been asking for! More blooming plants, tropicals, tillandsia, houseplants and all the lovely things that go with them that make your home, apartment, loft or office a welcoming place to relax and enjoy.

Naturally, we will be continuing to send our lovely things as gifts for all your special occasions! If you need a designer for weddings and events, we highly recommend contacting Laura Vance at (510) 575-5591 and Sue Hayashi-Smith at (510) 457-8352 for an elegant and exquisite design. 

Come pay us a visit as we create a new and exciting atmosphere for you to shop and enjoy! 

Love these old images of the nursery as much as we do? Then read on to The History of Orchard Nursery & Florist

Bareroot 101

And she was fair as is the rose in May.

                                    - Geoffrey Chaucer

Plant a rose now and you’ll have flowers in May! Our bareroot roses, including David Austin varieties, have arrived, been potted up in pulp pots and are ready for purchase! 

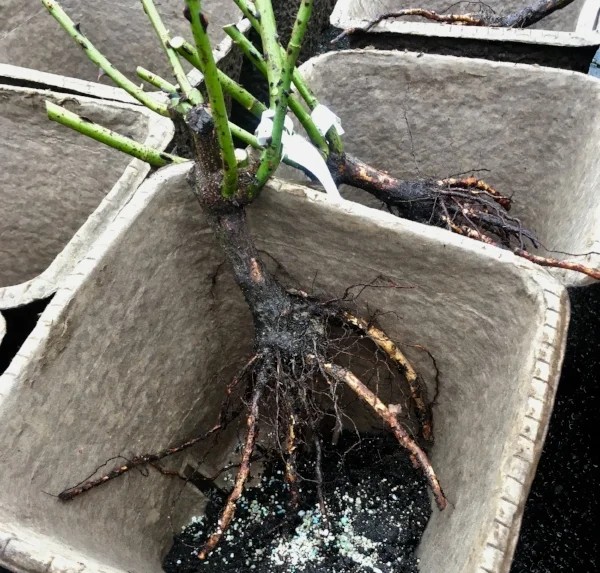
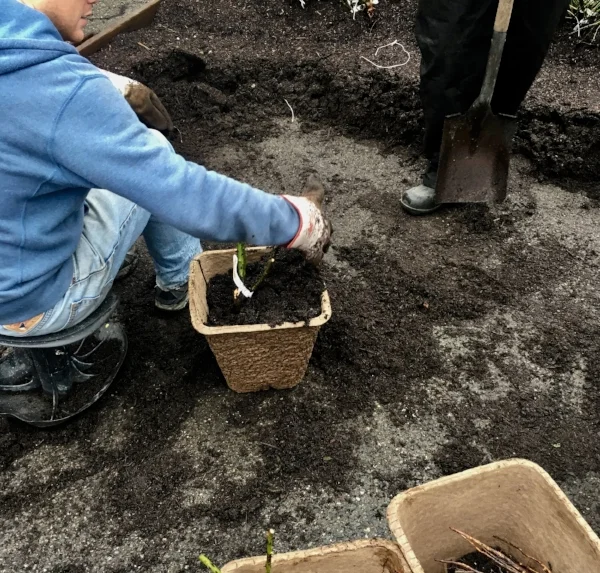
A shot of our bareroot roses, and below, our nursery staff potting them up for you!

A shot of our bareroot roses, and below, our nursery staff potting them up for you!

QUESTION OF THE MONTH: How should I plant bareroot roses and fruit trees that are in pulp pots?

We plant our bareroot roses and fruit trees in biodegradable pulp pots so that they can be planted through the growing season, not just during bareroot season (January and February).

How to plant your bareroot rose or fruit trees depends on what time of year you’re planting. It’s important to take note of the root development, which denotes when to remove it from its pulp pot and plant, or to plant it in the pulp pot to keep those roots protected!

THE MONTH OF PLANTING:

JANUARY - FEBRUARY: Remove plant from pulp pot and plant directly into the soil.

Our pulp pots will typically degrade completely within about a year. When planted early, we recommend taking bareroot plants out of the pots and planting as you would any bareroot plant.

MARCH - MAY: Plant pulp pot and plant together.

Once fully leafed out, roses and fruit trees are growing fine roots, which are easily broken. At this point, we recommend planting the pot and all to avoid transplant stress. Before planting, slit the sides of the pulp pot vertically in four places to within an inch or two of the top rim. The bottom may also be removed. Plant so that the soil in the pot is the same depth as the soil outside the pot. The rim of the pot may be removed, or you can leave it in place as a watering basin for the first year.

JUNE - AUGUST: Tear away pulp pot and plant your plant directly in soil.

Later in the season roots have developed enough that they will hold a root ball together. For best results at this stage, remove the pot by tearing it carefully away from the root ball. Don’t try to pull the plant out of the pot, as this will break roots.

eb-stone-sure-start-4lb-bag.jpg

“INSURANCE” for Bareroot Plants

Bareroot plants have been described as “sticks with roots”. If you’ve never planted anything from bareroot stock before, you might doubt that these leafless plants will ever amount to anything. But like a spring miracle, bareroot roses and fruit trees will leaf out and bloom the very first season (although it may take fruit trees a few years to produce a substantial crop).

Because they don’t have an established root system, we recommend helping bareroot plants by using Rootmaster B-1, which is more than regular B-1. It contains a hormone, similar to that in Rootone, that actually stimulates new white root hairs in plants. When used in conjunction with starter fertilizer, we recommend E.B. Stone Organics Sure Start 4-6-2, it gives plants a wonderful start and helps insure the health of the plant as it establishes in the landscape. Apply once a week, according to directions, for the first 4 to 6 weeks for healthy roots and shoots!

For planting roses we recommend using Pay Dirt. Formulated with chicken manure, redwood sawdust, peat moss and mushroom compost making it perfect not only for your roses but your veggie garden and flower beds too! Paydirt works to help loosen hard soils, (for all of us with that compacted clay!) and improves both water and root penetration.

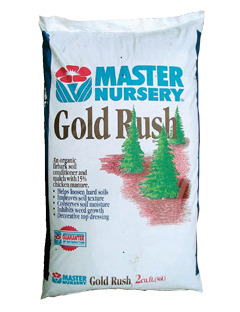
For your fruit trees, plant with Gold Rush. It’s a fir bark blend with 15% composted chicken manure. And it’s also on sale for the month of January (we’re talking January 2019!) Buy 3 bags of Gold Rush and receive 1 FREE! Gold Rush helps add important long-lasting organic matter to the soil, improves soil aeration and water penetration.

Questions? Stop in and talk with one of our nursery professionals today!